Sunday, April 22, 2012

DIY Large Checkbook

I know a lot of people now days mainly use Excel or Expense Programs but I still like tangible, non-computer versions of my finances. SO using a CHEAP note book, format of a bank checkbook, ruler and colored pens you too can create a large longer lasting checkbook for about $1

OK Lets make it!

First I added the Date lines, this is good so you don't have to look through the whole thing to find when it was started and ended when referencing finances.

I then glued a blank sheet on the inside cover to cover all the text that was there since it is no use to me.
Also since an 8 1/2 x 11 sheet of paper is a bit larger than this note book I just trimmed the edges to fit it. 

Now the actual pages I lined and formatted using the standard checkbook you would receive from your Bank.
Starting from the left I labeled the sections as follows:
1. Check # or Code (Like DC for Debit Card)
2. Date (I use the actual transaction date, the date on my receipts)
3. Transaction Description (Purchases, Bills, or Paychecks)
4. Payment (For purchases or Bills paid)
5. Deposit (For any paychecks or money received and deposited)
6. Balance (I leave an extra spot for the balance from the previous page in case a page goes missing )
 ***** I use red pen for "Payments" because standard accounting shows that the transaction is a negative transaction in my account. This is why I use green pen for "Deposits" as it shows a positive transaction in my account.


I printed a list of all my transaction descriptions and pasted them on the inside cover for easy reference.


Sunday, April 15, 2012

Homemade Laundry Soap

At the onset of our first encounter with Pinterest we came across our first project.

Here are the items needed:

1-4 lb 12 oz box Borax (2.15 kg or 76 oz) laundry detergent isle
1-3lb 7oz box Arm & Hammer Super Washing Soda (55 oz) laundry detergent isle
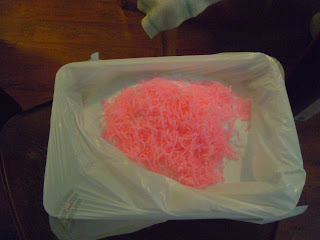
3 bars - Pink ZOTE Soap (can also find @ Home Depot if not in your grocery store) laundry detergent isle
              OR Fels-Naptha laundry detergent isle
1-4 lb box Arm & Hammer Baking Soda (1.81 kg)  cooking isle
Aprox. 3.5 lbs-Oxy Clean (optional) laundry detergent isle
1-Large Canister or several medium for storage
1-Scoop or Tablespoon for measuring

**Use 1-2 Tablespoons per load. I know that does not seem like enough but this recipe does not have fillers like the store bought detergent so you only need 1-2 Tablespoons.** 

1. Take all powder components and mix them together in a large bin, I lined mine with a trash bag to keep the detergent from being contaminated.
2. Grate the Pink ZOTE Soap or Fels-Naptha with a cheese grater, If you are fortunate enough to have a food proccesor than use that it will take much less time.
**Note: You may want to grate the Zote Soap separate to let it dry out a bit before adding to the powder mix. Otherwise you may have to take an Ice pick to the mixture as it hardens in to a solid block and not a powder form

3. Then mix in the grated soap to powder.
4. Now you are set to store your detergent and use as needed!!

This detergent is fairly mild smelling, it is not over powering. If you love a strong scent you may have to add a fabric softener to each load.

*We have seen that people with sensitive skin and many allergies be able to have their skin calmed down when they started using this mixture.

This first batch was made on 3.22.12 and is being used by 5 people I will update on how long this lasted the 5 people. Update! this batch lasted until 11-15-2012. So that's about 8 months! holy cow, so that comes out to be about $2.50 a month for laundry soap FOR 5 PEOPLE!

Started a new batch this time (11-15-2012) only 3 people will be using it so lets see how long this one lasts!!!


Going green to save some green!!

Being Eco-Friendly can cost a pretty penny at times. It is hard to find that balance of cost vs. payout. I have found a great way to be Eco friendly and save some money in the process.
What I decided to do was buy a recycling trash can. You can easily pick one up at home depot for anywhere between $10-$20 depening on what size you want.

Then you can get a can crusher at any home improvement store as well for about $5. I mounted the can crusher directly above the space I will be using for my trash bin.


Throughout the week as I drink a soda, beer, or any kind of aluminum can, I place it in a tray. At the end of every week I crush cans. It typically takes me 5-10 minutes to crush all the cans.

After researching some places, I can receive up to $1.50 a pound for my crushed cans. After only 10 pounds, I have my money back. Having a can crusher and recycle bin is an easy and effective way to crush cans and save some green.

If you are not that big of a canned drinker, be sure to ask friends and family to save a bag for you. Using friends and family has certainly helped me fill my bin quickly.

Saturday, April 14, 2012

New ideas to come

Tonight as we sit here looking over our new references we can start to plan and write about what we like, dont like and what we would tweek! We aquired 4 new books about designing, cleaning, and remodling and 2 new magazines with ways to simplify life. So as we look over these we will soon be expanding our blog creations to weekly or daily posts if we get the chance. We would love share all that we can with you and look forward to your feedback on our ideas and creations. Thanks for reading and keep an eye out for what's to come!!! Babs & Reesie